Showing posts with label technology. Show all posts

If you’ve been teaching for more than five minutes, you know that tech can be your best friend… or your eternal nemesis. 

The thing is, there are so many little shortcuts and tools that can make your teaching day smoother, but they’re not always obvious. And sometimes, the “simple” things are the ones we overlook the most.

Here are 10 of my favorite teacher tech tips you probably don’t know (but should), plus how they can save your time, your sanity, and maybe even your coffee.


1. Version History in Google Docs

Stop making “Lesson Plan FINAL - Use This One” and “Lesson Plan FINAL Final V2.”
Go to File → Version history → See version history and you can view, restore, and name past versions of your document. You’ll never need 87 duplicate files "copy of copy of copy" again.


2. Pinning & Grouping Chrome Tabs

If your browser looks like a game of Tetris, this is for you.

  • Pin Tabs: Right-click on a tab → Pin. This keeps it open, small, and locked to the left.

  • Group Tabs: Right-click → Add Tab to Group. Color-code and label them (Lesson Plans, Grades, Email).

Your future self will thank you.


3. Voice Notes on Apple Watch, iPhone, and Android

Ever had a brilliant idea in the hallway… and forgot it by lunch? Stop trusting your memory; just record it!

  • Apple Watch: Raise your wrist and say “Hey Siri, record a voice memo”. Saved instantly in your Voice Memos app.
  • iPhone: Open the Voice Memos app, tap record. Rename later so you can find it fast.
  • Android: Open the Google Recorder app (many newer phones have it built-in) or download a free voice memo app from the Play Store. Tap record and go.
Perfect for lesson ideas, parent reminders, or sudden lightbulb moments without fumbling for a sticky note.


4. Semantris & Quick Draw: Artificial Intelligence for Classroom Engagement

  • Semantris: A Google word association game. Great for vocabulary warm-ups, synonyms/antonyms, and brain breaks.

  • Quick Draw: AI tries to guess your doodle in 20 seconds. Fun for vocab review, art warm-ups, or just a laugh (“That’s not a potato, it’s a duck!”). Also, GREAT practice for little fingers on trackpads and computer mice. 

Both are free, web-based, and hook students fast.


5. AutoDraw for Quick Graphics

Need a visual but your stick figure skills are… questionable?
Go to autodraw.com, doodle your best attempt, and watch AI turn it into clean clipart.
Perfect for anchor charts, presentations, or classroom signs.


6. Mac/PC Screenshot Shortcuts

Stop printing your screen just to crop it.

  • Mac: Shift + Command + 4 = select an area to capture.

  • PC: Windows + Shift + S = select an area to capture.

Screenshots go right to your clipboard or desktop for easy pasting. Just use CTRL+V to paste the screenshot wherever you want it!


7. Email Filters for Sanity

Gmail: Click the gear → See all settings → Filters & Blocked Addresses.
Outlook: Settings → Mail → Rules.

Create filters for newsletters, parent communication, or team updates so they skip the inbox clutter and go right where you want them.


8. Google Keep Checklists for Routines

Google Keep is like sticky notes, but they don’t get lost under your desk.
Create checklists for daily classroom routines, student jobs, or even sub plans. Share with teammates for easy collaboration.


9. Keyboard Shortcuts You’ll Actually Use

  • Copy: Ctrl/Command + C

  • Paste: Ctrl/Command + V

  • Undo: Ctrl/Command + Z

  • Reopen closed tab: Ctrl/Command + Shift + T (the best one)

Little seconds saved add up to minutes, and that’s another sip of coffee.


10. Using Headings in Google Docs

If you have a 14-page doc, scrolling is a nightmare.
Highlight text → Change from “Normal text” to “Heading 1/2/3.”
Then use View → Show Outline to jump around instantly.
Great for lesson plan binders, curriculum maps, and student project docs.


Final Thoughts

Tech doesn’t have to be overwhelming. In fact, the simplest features are often the most powerful.

Start with one or two of these tips this week. Use the time you save to do something just for you: drink your water, eat your lunch, or (my favorite) take a bathroom break.

What’s your go-to teacher tech hack? Drop it in the comments so we can all steal it.

Let’s just say… my brain doesn’t believe in linear thinking.

I’m a former teacher with a to-do list the size of a CVS receipt and a mind that skips like a playlist on shuffle. Sound familiar?

Whether you’ve been diagnosed with ADHD or just feel like your brain has 47 tabs open, I want to share what’s actually helped me stay focused, feel less frazzled, and still function when my brain is doing backflips.


The Tech Tools I Swear By

1. Focus Keeper App

This little Pomodoro-style timer is a game-changer. I set 25-minute work blocks and challenge myself to stay focused just until the buzzer. It removes the pressure to be "on" all day and lets me work with my brain, not against it.

2. Google Keep

Digital sticky notes are my brain-dump sanctuary. I can organize by color, pin important tasks, and access them from anywhere. When ideas hit me mid-coffee sip or mid-scroll, they go here.


3. Forest App

This one grows a digital tree while you stay off your phone. If you touch your phone, your tree dies. Dramatic? Yes. Motivating? Also yes. I love seeing my little forest flourish by the end of the day.


4. ChatGPT

For quick answers, rewrites, lesson ideas, captions, and planning help. It’s like a thinking partner that doesn’t interrupt. I use it to brainstorm when my brain is stuck in the fog.


Peptides That Help Me Function

Enter my secret weapon: MAKE Wellness peptides.

These are all-natural, sweetener-free wellness supplements designed to support your body and mind. Here are the ones I use for focus, energy, and calm:

  • Focused: 1 capsule in the morning. It helps me zone in when I’m distracted by every bird, beep, and browser tab.

  • Energized: This powdered mix gives me caffeine without the crash. It keeps my thoughts clearer and my motivation higher.

  • Calm: I take this before bed so my brain doesn’t play the highlight reel of tomorrow’s to-do list on repeat or zero in on that one awkward moment I had twenty years ago. 

I still lean on healthy habits like walking and sleep, but these peptides have made those habits easier to stick with.


TL;DR

If your brain is buzzing and burnout feels close, you don’t need to reinvent your entire routine.

Start small: try a 25-minute focus session. Try one new supplement. Try a tech tool that takes pressure off your brain.

Supporting your ADHD brain (or your teacher-brain-that-feels-like-ADHD) doesn’t have to be overwhelming.

It can be a few smart tools + some gentle support = a more functional, calm, and focused YOU.

You got this.

 Hey guys! How are y'all doing out there in virtual world? We are heading into the end of our second week of 100% online learning. It has been an interesting time, to say the least. We have been learning a lot of things and changing a lot of things. 

One thing that has been a lifesaver is our communication platform, ClassTag. This has been a steady form of communication between the school and home since we closed on March 13, 2020. I wanted to share with y'all exactly how we are using the platform and how it can help you out, too!

Last year, my school started using ClassTag. Now, I'm going to be honest here: I wasn't thrilled! I had used ClassTag at my previous school in 2016 and we didn't really like it. There were just some issues that we couldn't get worked out and we bailed. 

HOWEVER!!!!!

Last year, I really got into using it - ClassTag had upped its game! The app ran so much more smoothly, things were uploaded and posted faster, the calendar was MUCH easier to use and schedule events. It was such an amazing change from the first time I had used it. That told me one thing: ClassTag listened to feedback and CHANGED!

So here's just a few things that ClassTag can do: 

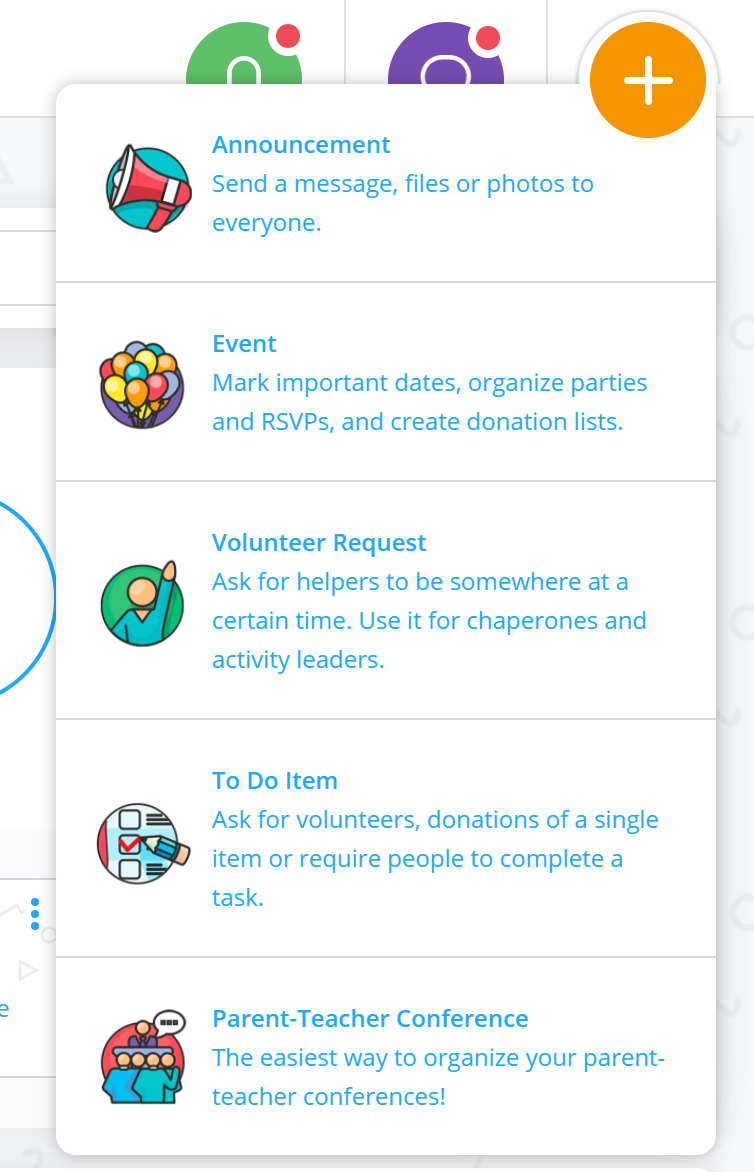
  • Classroom and school wide Announcements
  • Parent Teacher Conference Signups
  • Events with RSVP and materials/donations lists and signups
  • Volunteer Requests
  • To Do Itemized list for donations
  • Student Backpacks to collect student work or share private notes/pictures/grades!


So our school wanted to change to ClassTag because it offers ALL of these things in one convenient location. We communicate A LOT with our school families. I'm talking, multiple times practically everyday! Pushing out school wide updates, announcements, files, quick anecdotes, and so much more. 

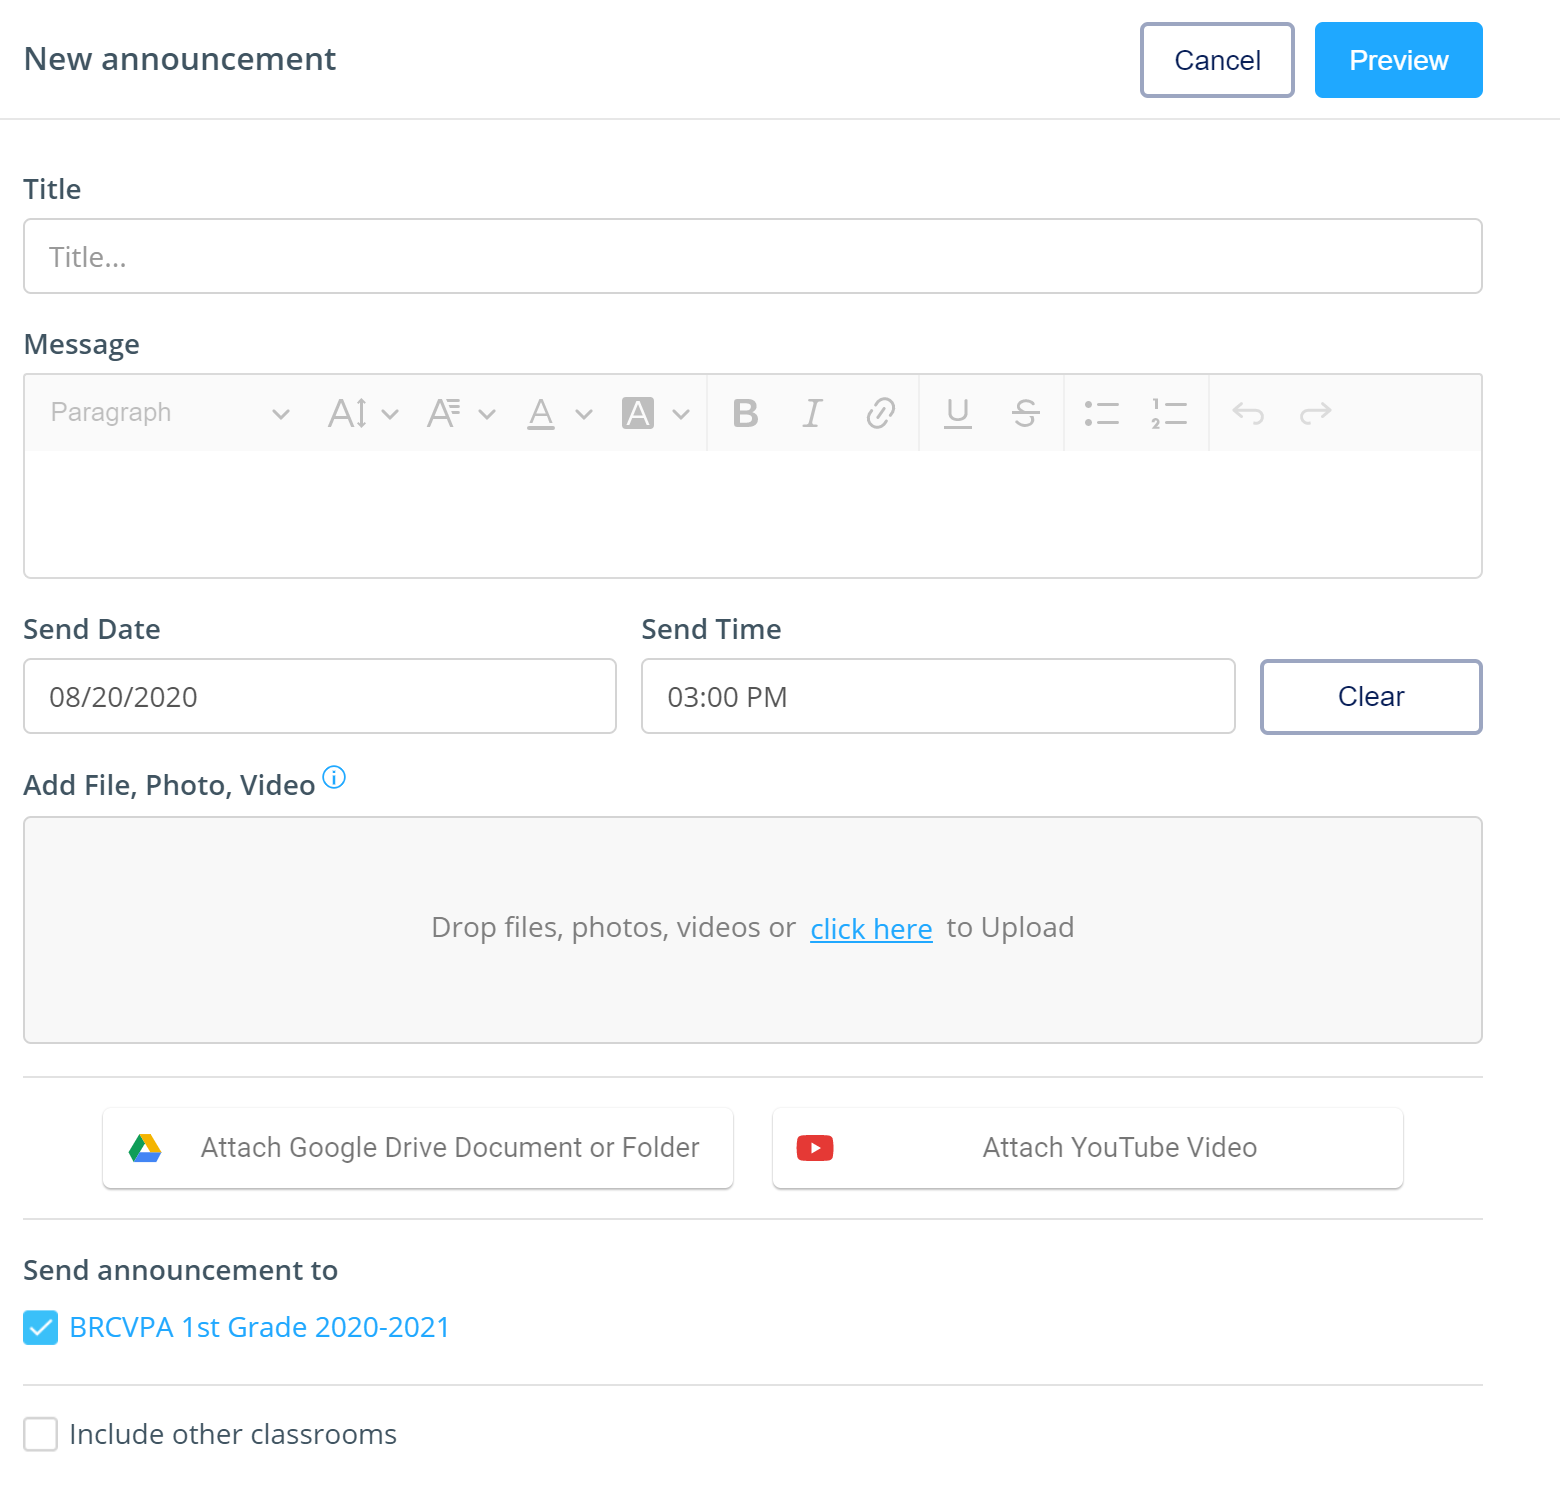
My absolute new favorite is that it integrates smoothly with Google Drive and Classroom. When you type up an announcements, you can add things from Google Drive or a YouTube video. These things are added to your Classroom Library where they can be accessed by all. AND you can schedule these announcements to send out when you want them to. Makes planning a breeze. Spend one day scheduling posts, and you're done!

As a School Leader, I can log in and send grade level specific announcements and materials by selecting the classrooms through a check box. Works wonders when you need to tell K-2 something that 3-5 don't need to worry about or vice versa. So as a school leader, I can log in and see our School Page. 
My options to post something are limited to making announcements and scheduling events, but they will be sent to everyone connected to our school.

Another new thing I'm loving is the Student Backpacks.
 
These are essentially digital portfolios. Students can collect work in their backpack, parents can send pictures to the teacher, the teacher can send pictures and updates and personalized work and notes to the parents, etc. This is a secure teacher/student only location, so no other families can see what's in a student's backpack. 

And at last, I am so happy that ClassTag changed the color of these bubbles! 
So the middle one used to be grayish, and it looked like you couldn't do anything with it since when things are grayed out is usually means can't touch. But NOW it's bright purple and easy to see! 
The green button is brand new, and it's notifications. Since I'm a member of multiple classrooms, I may miss some announcements, so when I open my app, my green notifications bubble will let me know what's happened since I last checked. The orange bubble is to add one of the things I listed above. Easy peasy!

So on to Messages!! This is, after all, a COMMUNICATION app! 
The messages are so easy to send! See that little blue speech bubble in the upper right corner? Touch it to start a new thread. All of your connected parents and teachers show up and you can check off who you need to send a message to. (You can also click Start Conversation on the computer).

Along the side you can see all the messages I've received and how long ago. I've blocked out the names for privacy purposes, but you can see what it looks like. You can send pictures and videos this way as well. Today, I had a parent ask me how to upload a video of her son for a drama class assignment. I made a quick screen recording on my iPhone and sent it to her via the app!

ClassTag is also available as a smartphone app AND on the computer. Parents can get email or text notifications. This app has endless possibilities!

I'm so happy to be able to share this app with you can I hope you want to explore it yourself! Click the link below to try it out today! 

Try ClassTag!

Thanks for reading, and happy teaching!

Hey guys!! 

I'm so excited to share this tool with you. I posted on IG earlier this week and was overwhelmed by the response! 


So I've been working on this online "app" for my teachers at my school. I've been making virtual tutorials via video as well as creating Google Docs and Sheets containing anything they might need at their fingertips during back to school mania 2020-2021. 

You can see an example of this activity at this LINK

So here is a quick tutorial on how I made this! 

First, I start in PowerPoint and create the hexagonal buttons with cute fonts. Then I save each of those as a picture in a file folder on my computer (you can see how I do this in my video below). 

Then I add each picture I created to my Google Slide Deck I've made. 

Once you've got your slide designed, you have to start linking your tutorials, videos, and documents. First, select the picture you want to link. 


Then, click the link button on the menu (or press CTRL+K). 
Paste the link to the document, website, or video. 

And click apply. That's it! 


Lastly, all you'll want to do is make sure anything that you don't link to an outside resource, like the title, is linked back to the slide that it's on. If its on Slide 1, link it to slide 1. 

Watch this video for a more thorough walk-through of this tutorial!


Grab your FREE template HERE. Also, I've linked a ZIPPED copy of my PowerPoint template I made for this online app. Grab it HERE. I've included what font names I used, so you may have to purchase and download them if you want yours to look like mine!

Thanks and Happy Teaching! 

I'm loving my free time this summer!! But obviously I can't keep from thinking about next year!! I'm currently writing a blog post about creating a fantastic classroom library and I wanted to give a quick tutorial about how to make labels using the latest Microsoft Word.

Hello! Just a quick jot tonight to share my latest remake of my listening library.
QR Codes!


I have collected A LOT of books on CD over the years and the baskets of bags aren't very attractive on the counter. Here is a picture from the beginning of the year (before the children got their hands on them!) and before I ordered more a lot more from Scholastic. I'm a sucker for new books.

As you may have heard I'm moving up from first grade to SIXTH grade. I'll be teaching Media Literacy and Video Production. Yup. No more primary for me :(

I'm a little sad, but also a little excited! I'm sure as the school year moves closer I'll be MORE excited! Stay tuned for the middle of July!

For the time being, I'm going to share with you an activity I've been working on. I LOVE interactive notebooks. However, they take up a lot of time and a lot of paper and a lot of glue. I've got to spend lots of days training my firsties on how to properly cut and paste the activities in their notebooks.

Hello! Just a quick jot tonight to share my latest remake of my listening library.
QR Codes!


I have collected A LOT of books on CD over the years and the baskets of bags aren't very attractive on the counter. Here is a picture from the beginning of the year (before the children got their hands on them!) and before I ordered more a lot more from Scholastic. I'm a sucker for new books.
It's just overflowing now. 
So I'm giving it a makeover.

Have you ever used QR codes in your classroom? They are so fun! The kids love to use the iPads and scan and listen to audiobooks.

Here's how to get started:
Put all the audiobooks onto your computer in .mp3 format.
I use Windows Media Player. Insert the CD and open Windows Media Player. Click on Rip Settings, then Format, then choose MP3
Then click Rip CD.
Once it's uploaded to your computer, you'll need to get a URL for the QR code. To get that, you'll need to upload the audio file to a file hosting site like Dropbox.
Sign in or create account.
Add a file to the Dropbox.
Once it's uploaded, click on Share.

This box pops up and there's the link you need!


Copy it.

Now, find a QR creator website that you like. I like QR Stuff. SUPER easy to use. Type in the web address and the screen you need immediately pops up.
See? Easy Peasy.

Paste the link, choose the Encoding Options, and BAM - there's your code. Click to download the code as a picture. 

I print out the picture and tape it to the back of the book. The kids can scan the code and then listen while reading along. No more CDs and paper cases and books in bags.


I'm loving this new system! 

How do you use QR codes? Anything new and easy? 

Happy teaching, 
Powered by Blogger.
Back to Top