I also made signs for my niece and nephew. I uploaded it to Facebook and had so many compliments and questions about how I made the signs. I've made personalized signs for many of my friends and family.
Here is your chance to get your very own personalized sign for the first day of school!
Just click on the link below and download. Open it in PowerPoint and BAM!
I have embedded the fonts I've used, but just in case here is the list:
These are the fonts:
Hello Heartache
Life's a Beach
KG No Regrets Sketch
A Little Sunshine
Janda Safe and Sound
Do a Google search and install.
So let's get started. Here's how it works:
Open the file.
Click in a Text Box and highlight the text you want to change.
The font will automatically adjust to fill the size of your words.
Or you can resize the text box yourself, by clicking and dragging the handles around the edge of the text box.
You can change the color, font, and style:
You can't change the font size because I've used word art boxes to automatically adjust the size of your text.
I have included a page without any clipart in case you want to add a picture of your own.
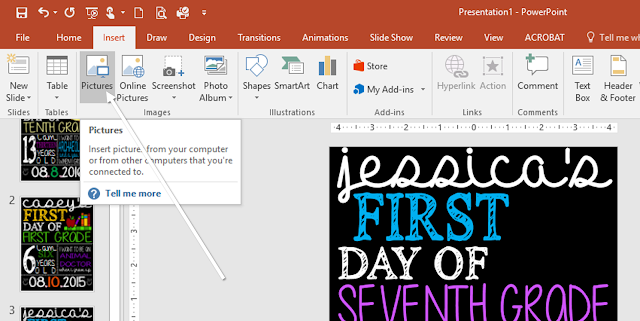
Just click on the Insert tab and choose Insert Pictures. Navigate to find your own pics.

And that's it! My sister uploaded her signs to Walgreens and had an 8 x 10 printed for around $4 bucks I believe.
For Carly's Eighth grade year I printed the file as a poster on my home printer. Yep, a lot of ink and a lot bigger than I had intended, but hey, it worked!!
Some printers will allow for poster printing. If so, here is how to print a poster:
Go to print the file and click on Printer Properties.
You get this pop up menu. Click on the Layout tab at the top. Click enable under Poster Printing.
You can opt to print on 4 pages or 9 pages or 16 pages. See where it says 2x2? Use drop down arrow to choose. I used 2x2 and then taped the pages together. Click the "on" box next to Add Crop Marks to make it easier to cut out and tape together.
{HERE} is the link for the signs. It's a zip file - download and extract.
Here is a Google Drive link for the file in Slides, if you prefer to work right in your browser with all Google!


No comments